Friday, April 24, 2015

Honey Lime Chicken Enchiladas with Avocado Cream Sauce

I am in love with these enchiladas, and I have been requested to make these often by family members. Kudos to Chef in Training for making this recipe. They're perfectly delicious!

Just as a heads up, the enchiladas freeze beautifully, but do NOT include the avocado cream sauce before freezing. Grossness will ensue. Also, do yourself a favor and add more lime juice and honey to the marinade. You'll thank me later. :)

Honey Lime Chicken Enchiladas with Avocado Cream Sauce:

INGREDIENTS
  • ⅓ cup honey
  • Juice from 2 limes
  • 1 tsp. minced garlic
  • 2½ cups cooked and shredded chicken (I use a rotisserie)
  • 1 cup corn, frozen
  • 1 cup black beans, drained and rinsed
  • 2 cups Monterey Jack cheese, divided
  • 10 (8-inch) flour tortillas
  • 1 (28 oz) can Green Chile Enchilada Sauce
  • AVOCADO CREAM SAUCE
  • ¼ cup butter
  • ¼ cup flour
  • 1½ cups half and half
  • 1 cup chicken broth
  • ½ tsp. garlic salt
  • ½ tsp. onion powder
  • ½ tsp. salt
  • 2 avocados, peeled, pitted and diced
  • ¼ cup chopped fresh cilantro
  • juice from one lime
INSTRUCTIONS
  1. In a small bowl, combine honey, lime juice and minced garlic and stir until well combined.
  2. Place cooked and shredded chicken in a large zip lock bag and pour sauce over the top. Seal up the bag and toss/shake gently to coat all the chicken. Place sealed bag in fridge and let marinate for at least 30 minutes.
  3. After chicken has marinated, preheat oven to 350 degrees F.
  4. Dump marinated chicken into a large bowl. Add corn, black beans and 1½ cups shredded Monterey Jack Cheese and stir to evenly combine.
  5. Spray a 9x13 pan with cooking spray and then pour about ¼ cup of green chile enchilada sauce evenly over the bottom of pan. Pour remaining enchilada sauce into a large bowl.
  6. Dip tortilla into the enchilada sauce and gently squeegee off the excess sauce with fingers.
  7. place 1/10th of chicken mixture into the center of tortilla and spread out evenly length wise. Roll up the tortilla enchilada style and scoot to the edge of the pan. Repeat for remaining tortillas and filling.
  8. Make the Avocado cream sauce: In a large skillet over medium heat, melt butter. Once butter has melted, add flour and stir to combine and continue stirring over heat for about 2 minutes. Slowly and gradually add in half and half and chicken broth. Continue stirring over medium heat until sauce has thickened. Remove from heat and add garlic salt, onion powder and salt. Stir to combine. Let sauce cool down completely then pour sauce in blender. Add avocado, cilantro and lime juice. Cover and beat/pulse until smooth consistency.
  9. Pour sauce over the top of the enchiladas. Sprinkle remaining ½ cup of Monterey Jack cheese over the top of sauce.
  10. Bake at 350 degrees for 25 minutes.

Sunday, December 23, 2012

Chocolate Orange Chocolate Chip Cookies

Do you see the little sugar-ized orange zest on the tops? Oh, yeah.
(Pardon the phone camera picture. I'm getting lazy in my old age.)
These look innocent enough. Until you realize you've eaten the entire pan all by your little lonesome.

A holiday tradition from 2000 when Dan and I met the Mizukawa family in our first student ward at the University of Utah. Amazing. Enjoy!

Chocolate Orange Chocolate Chip Cookies

1 cup sugar
2/3 cup butter, softened
1 Tbsp. orange zest
1 egg
1 1/2 cup flour
1/3 cup cocoa
1/4 tsp. salt
1/4 tsp. baking powder
1/4 tsp. baking soda
1 cup semi-sweet chocolate chips

1/3 cup sugar
1 tsp. orange zest

Preheat Oven to 350 degrees. Mix 1 cup sugar, butter, 1 T. orange peel, and egg. Stir in flour, cocoa, salt, powder, and soda. Stir in chocolate chips.

Mix the 1/3 cup sugar and 1 t. orange zest together. Roll dough into 1 1/2" balls. Roll into mixture. Place 3 inches apart on an ungreased cookie sheet. Flatten to about 1/2 inch thickness with the bottom of a glass. Bake for 9-11 minutes or until set (but still a bit gooey).

Wednesday, October 24, 2012

Best Ever Chocolate Cupcakes

Not from the box. No sawdust included. I hope that doesn't disappoint anyone.


Chocolate Cupcakes:    Shannon Brems, originally from Suzanne Disbrow

3 C. flour
2 C. sugar
½ C. cocoa
2 tsp. baking soda
1 tsp. salt

Mix the above in Bosch. Then blend in:

2 eggs
1 C. buttermilk
1 C. oil

Then pour in:

1 C. boiling water
1 tsp. vanilla

Mix well. Use ¼ cup measuring cup to distribute the batter evenly amongst the 36 cupcake liners.
Bake at 330 for 20 minutes.


Fast Fudge Frosting:

1/3 C. butter
1/3 C. hot water

Put the above in a microwave-safe bowl, and microwave until butter melts and water is boiling hot. Add:

Dash of salt
1 tsp. vanilla
½ C. cocoa
4+ C. powdered sugar

Dip the tops of the cupcakes into the frosting and let them “dry.”


Cream Cheese Frosting:

8 oz. cream cheese
1 C. butter
5 C. powdered sugar
2 tsp. vanilla

Beat butter and cream cheese for 2 minutes. Add powdered sugar 1 cup at a time beating for 1 minute with each addition. Add vanilla in the middle. Pipe onto cupcakes.

Monday, October 15, 2012

Artisan Bread in 5 Minutes a Day

I randomly came across this book a couple of weeks ago and thought, "Pfft, yeah, right." I have been making my own bread for years, and it always takes at least an hour and a half, if not two." However, the more I read the reviews and saw the delicious pictures, I was hooked. I bought both of the authors' bread books from Amazon last week, and I have more than doubled my butter intake in the last 24 hours. BUT! I'm in love. As in, I have devoured three loaves in the last 24 hours type of in love.

(Please, if you're interested in their method and recipes, be respectful of their time and energies and buy their book.)

Here's what I love so far:

* It truly is only five minutes of "work" on the day I want bread. (Take the tub out of the fridge, hack a chunk off, cloak it, and put it on the pizza peel to rest/rise) The rest/rise time is 40 minutes and the baking takes 30 minutes, just FYI. Heck, it's only five minutes of mixing on the day you make the dough.
* The hard, crispy outside and the soft, gluten-y inside is pure perfection.
* No kneading the loaves, so I don't even have to get my beloved Bosch all messy. One big plastic tub (with a lid) and a wooden spoon. Five minutes of mixing.Voila!
* You don't have to wash the tub between batches. In fact, they suggest just the opposite. Even better!

This is my second try. Look at the brown and crispy edges! Mmm . . . 
Here's what I haven't loved so far:
* The initial expense of buying a lidded tub, pizza peel, and cooling rack (because I didn't already have these items), but that was a minor purchase of < $30. If you don't have a pizza stone, that would be another larger expense.
* The (what I'm assuming is an) incorrect indentation of ingredients on the Master Recipe. Pardon the soap box. I'm a printer's daughter with an English degree. See below.

Why the indentation for the flour?  (Come on! It's the Master Recipe!) 
Clearly you can see that the love far outweighs the not-love. SO! Go buy their book and make some goodness for your family today. And tomorrow. And the next day. Like I am doing. Because it's that good. Trust me. GO.

Tuesday, August 7, 2012

Toni Harris' Easiest Ever White Bread Recipe

Forgive me for not having a picture of this recipe. I'll get to it. I've had so many people ask me for this recipe, I have to just post it here for convenience.

My friend Toni works with me at The Quilting Cottage, and she is just too fun to be around. I love working with her. She's funny and witty and so wise. She shared this recipe with me and it has saved my hide so many nights when I need to make some bread or roll for dinner and just don't have the time for my Homemade Whole Wheat recipe.

Just a helpful note: If you're using a Kitchenaid Mixer, half the recipe so you don't burn your motor! :)

White Bread (or rolls, or pizza crust, or breadsticks, or . . . )

10 1/2 cups all purpose flour (I use unbleached)
3 T. yeast
1/2 cup sugar
1 T. salt (I use kosher or Real Salt)
4 cups HOT water
1/4 cup oil (I use canola)
1 egg

Mix all four dry ingredients in your mixer. Add wet ingredients. Cover, and mix for five minutes. Shape into loaves, let rise, then bake. Voila! (To rise and bake, I use the same method as my wheat recipe. I preheat the oven to 180 degrees, then turn it off. Put loaves in, set timer for about 20 minutes. When loaves have doubled in size, begin preheating oven to 350 degrees, and set timer for 20 minutes. Bake until loaves are 180 degrees.)

Thursday, April 12, 2012

Surfs Up!

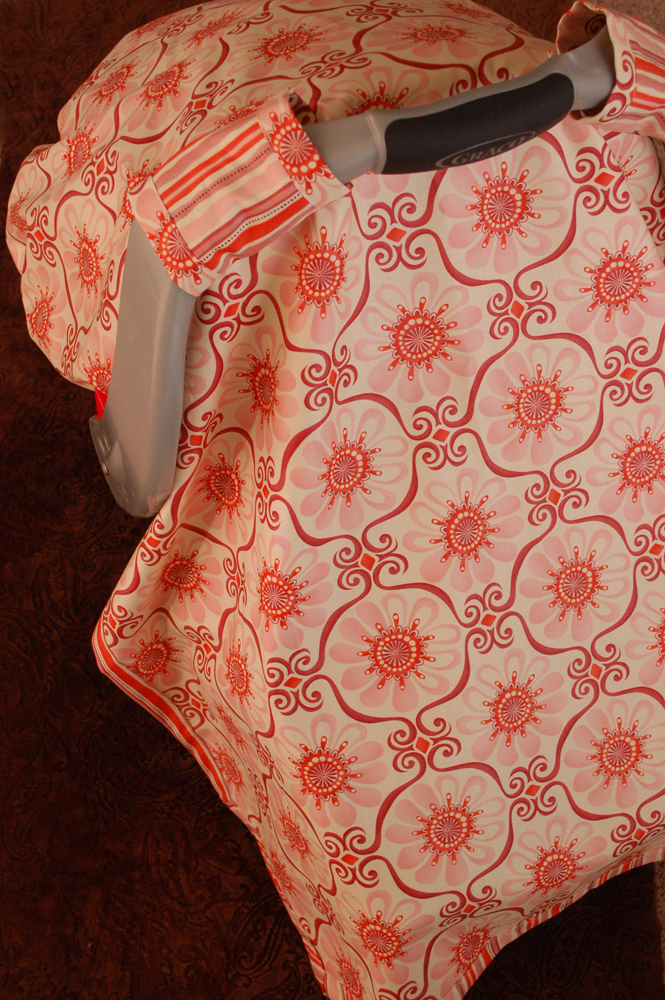
My darling cousin, Amy May, asked me to do a surfer themed car seat blanket for her friend who lives in Kauai. Done. I was so excited to work on this! It was a pleasure from start to finish. Thanks, Amy! Oh, and if anyone wants to do a similar one, order the pattern for the car seat blanket here, then get Quiltsmart interfacing for the Pumpkin Seed. I made the "seeds" skinnier than it guides me to, and sewed a straight line across the bottom before turning it right side out and appliqueing it on. Ta da!

Wednesday, January 18, 2012

Italian Stuffed Shells

When I cook something that I know is a tried and true recipe, I double it. And freeze the extra. It's a no-brainer.

Stuffed Italian Shells (Nicole Kunze)

8 oz. cream cheese
8 oz. sour cream
1 c. mozzarella cheese, grated
1 c. cheddar cheese, grated
1 lb. ground Italian sausage
1 (24 oz.) bottle spaghetti sauce (homemade is obviously the best)
1 box large pasta shells

Preheat oven to 350. Prepare a 9x13 baking dish by pouring 1/2 cup of spaghetti sauce into the bottom. Boil pasta shells for 10 minutes; drain and set aside to cool. Blend cream cheese and sour cream with a mixer until smooth, then stir in mozzarella and cheddar with a spoon (leaving some for sprinkling on the top). Cook sausage thoroughly; drain and add to the cheeses. Spoon a few tablespoons of cheese mixture into each shell and arrange in the prepared dish. Cover the shells with the remaining spaghetti sauce and top with leftover mozzarella and cheddar cheese. Bake, uncovered, for 30 minutes.

WHEN DOUBLED:
Double everything, except add even more cheese. I use 3-4 cups of each mozzarella and cheddar cheese. The two boxes of pasta shells is more than plenty.

Makes two 11x7 pans and two 8x8 pans full (see pictures)

For my little brood, the 11x7 pans are perfect for a dinner for us all and a lunch for Dan the next day.
The 8x8 pans are perfect for one dinner.

Cheese! Glorious cheese!

Tuesday, October 4, 2011

Sneak A' Roos October 2011

My name is Kristi, and I am addicted to fabric and photography. Mostly fabric, though. It's a real problem, people. Oh, and I have a serious problem with too many shoes in my closet. The bigger problem is that the buck doesn't stop there. See, I have this love of shoes for my kids as well, and my oldest is a girl. Yikes. My sweet husband won't let me buy any more shoes, but my addiction of said shoes must be fed. So, my friend Lea sells Sneak 'a Roos shoes. You know, the ones with the squeaky soles that make you giggle when the Bitty One toddles toward you in the grocery store? Well, I asked her if she wanted to do trade work with me so I could feed my shoe addiction. She agreed, and I couldn't be happier. Thanks, Lea!

If anyone happens on this site and likes my style, email me at kristiaskew@gmail.com for more information.

Wednesday, August 24, 2011

Handsome Little Man


My boys are all boy. Well, except for when Clara convinces Ed to play dress-up with her. 

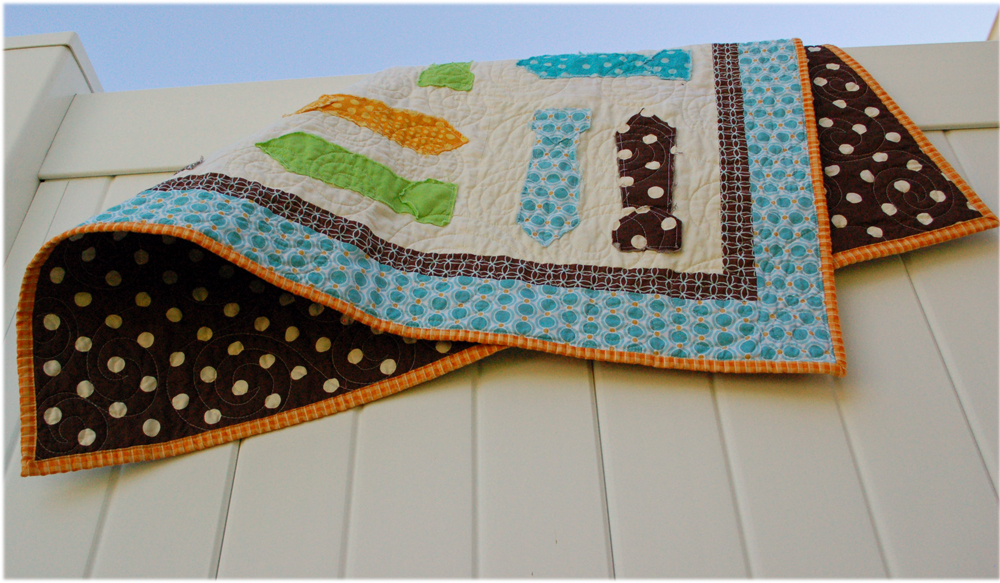
I had the fun idea to take scraps and make them into neck ties for a boy quilt. The ladies at The Quilting Cottage loved it so much they want me to make a pattern for it and sell it there. Yippee! 


Monday, April 11, 2011

Amy Butler in Bows Quilt


I had to have this fabric. I'm so glad I got it. This is the most darling, bright and cheery quilt!


Friday, February 4, 2011

Fandango Fetish Finished!

I fell in love with Kate Spain's line Fandango.
I had to buy enough to make four (you read that right, FOUR) car seat blankets/canopies.
I loved how they all turned out! 


Thursday, January 27, 2011

Homemade Honey Whole Wheat Bread

About three years ago, my friend Jenny Hardy taught me how to make bread. For reals. You know, the kind you feel good about feeding your kids? No preservative-filled, store-bought white trash. Plus, it's soft, smooth, and sweet. Nothing like what most people think of when they imagine whole wheat bread. I make a batch of bread at least once a week for my family. I can count on one hand the loaves of store-bought bread my family has eaten in the last three years. It's that good.

A little teaser:
Can you smell that goodness? Aaaaaaah.
Now to introduce you to the cast of characters:
Bosch mixer (a must - worth every penny); dough enhancer; vital wheat gluten (gluten flour);
freshly ground wheat (hard white wheat in my case); yeast; honey; canola oil; two eggs; salt;
small loaf pans (Norpro shown).
And yes, that's my creepy son peeking out behind the canola oil.
I didn't know he was there until I had the picture downloaded and on the computer. Sorry. 
To begin, put 4 cups of wheat flour in your mixer. Add 2 T. yeast and 2 T. dough enhancer. Add 1/3 c. gluten flour and mix a bit. (If you do use white flour for at least 1/3 of the flour in this recipe, you can leave out the gluten flour.)

Add 4 1/2 cups of warm water. Let yeast activate for a few minutes until it looks something like this foamy stuff:

Now add your two eggs, 2/3 cup of canola oil, and 2/3 cup of honey. (tip: use the same measuring cup for the honey and oil, but use it for the oil first. It'll allow the honey to slide right out with no sticky mess to clean up.)

Mix this together, and while it is mixing, add your 1 1/2 T. salt. (I think kosher salt makes a completely different flavor to the bread. Almost a sweet bread.)
Now add the rest of your flour (about 6-8 cups) slowly until the dough begins to clear the sides of the bowl. Keep it mixing/kneading on speed 1 or 2 for 10 minutes.
See how it's just beginning to clear the sides of the bowl? That's perfect.  Don't add more flour.
I promise it'll look better in a few minutes.
This is how it'll look about 4 minutes in.
This is how it'll look at the end of the 10 minutes.
Oh, the aroma!
While your mixer is doing all the hard work, preheat your oven to 175. This will help your bread rise quicker. I also use this time to put the ingredients away and psychologically tie the smell that is wafting to some quality mom time with my kids. I'm so evil.

Prep your loaf pans with cooking spray and set them out.
Put about 1/4 cup of canola oil right on your counter top. Spread it around and leave your hands oil-y. This will help you get the dough out of the mixer more easily.

Dump the dough onto your counter and divide it into the number of loaves you'll make (5 smaller loaves in my case).
 Shape into loaves and put them into your prepared pans. (Isn't that just pretty?)
Place all five loaves into your preheated oven, and then turn it off. Yes, off. Set your timer for 25 minutes. This will let your loaves rise in a warm oven.

Wait until they double in size (about 25 minutes).

Keep your bread in the oven. Set your oven to 350, and set your timer again, this time for 20 minutes. (My oven beeps to say it's heated to 350 about ten minutes into my new timer setting.)

Have a food thermometer ready at the end of your 20 minute baking time. Stick it into your largest loaf and wait until it reads 180-185 degrees. Watch closely. Pull loaves out when it reads 180 degrees.
 Wait about 10-15 minutes, then turn out onto a clean towel. Grab a good bread knife, and watch it disappear! Enjoy!


Want a printable recipe? Email me at kristiaskew@gmail.com


Tuesday, January 11, 2011

Honey Lime Chicken Enchiladas

My friend Lindsay Stobbe sent me this recipe, and of course I don't remember the cook book it came out of, but oh my. It's divine. Our new favorite!

Honey Lime Chicken Enchiladas

1/2 c. honey
1/4 c. lime juice (I used the juice from 3 limes)
1 T. chili powder (I only used about 1 t.)
1/2 t. garlic powder (ick. I used real garlic.)
1 1/2 lbs. chicken, cooked and shredded (To cook and shred my chicken, I put them in my Crock Pot and cooked on low with some chicken broth.)

Mix first 4 ingredients and marinate chicken for at least 30 minutes

2 (10 oz) cans green enchilada sauce
1 c. half and half (but why not just use heavy whipping cream? Mmm. . . )
flour tortillas
colby jack cheese

Mix enchilada sauce with half and half. Put a bit in the bottom of a 9x13 pan. Wrap tortillas with marinated chicken and some cheese. Roll and place seam side down in pan. Pour remaining sauce over the top of the enchiladas and sprinkle with cheese. Bake at 350 for 25-30 minutes.

I promise you'll love these.

Monday, December 27, 2010

Christmas Soups - 2010

I used three recipes for my Soup Extravaganza this Christmas:

Cream of Broccoli Soup (Jen Smith)

6 c. chicken broth
1 c. chopped onion
2 tsp. salt
1 large head broccoli, chopped
1 1/2 c. flour
1 1/2 c. butter (yes, that's three cubes)
2 qt. half and half (or use a mixture of half and half and milk)
1 (8oz.) jar of Cheese Whiz

Combine broth, onions, salt, and broccoli. Cook until broccoli is tender. In separate pot make sauce - melt butter, add flour and blend into a paste. Add milk all at once, stir constantly until thick (when it bubbles). Stir in Cheese Whiz. Add to undrained broccoli.


Kristi's Sweet Chili

1 lb. ground beef
1 green pepper, chopped
1 red pepper, chopped
1 medium yellow onion, chopped
1 garlic clove, chopped
1 tsp. pepper
1 1/2 tsp. kosher salt
1 T. olive oil
1 can (28 oz.) petite diced tomatoes - undrained
1 can (4 oz.) diced green chiles
2 cans kidney beans - rinsed and drained
1 can (8 oz.) tomato sauce
1 cup water
1 c. brown sugar

Preheat large pot and brown beef, bell peppers, onion, and spices together in oil. When beef is browned and veggies are tender, add remaining ingredients. Simmer 45 minutes, stirring occasionally. Garnish with sour cream, cheese, onions, etc. Serves 8-10


Creamy Chicken Soup (Nicole Kunze)

1 small onion, chopped
1 T. butter
3 c. chicken broth (I use 3 cans)
4 medium carrots, chopped (I use a bag of mini carrots)
3 medium potatoes, peeled and cubed
2 c. cooked and cubed chicken (I use rotisserie chicken from Costco)
2 T. fresh parsley
salt and pepper to taste
1 c. milk
1/4 - 1/2 c. flour
1 (8 oz.) package of cream cheese - room temperature, cut into small cubes

Saute onion in butter; add broth and veggies. Bring to a boil; reduce heat, cover and simmer until veggies are tender. Add chicken, parsley, salt, and pepper.

Combine flour and milk until smooth. Add to pot of veggies. Bring to a boil, cook and stir for two minutes or until thick. Reduce heat; add cream cheese until melted.  This soup is very thick. Add milk or water if needed.

Tuesday, December 7, 2010

Christmas Table Runner

I just finished this table runner for our Etsy shop, and I was so pleased with how it tuned out, I had to post it here, too.

I did the quilting. The first time I dared use my free-motion foot to do any quilting. Yes, you can see some flaws, but overall I'm very pleased with how it turned out!


Showing the underneath side of the runner and the binding. So fun!

The worst picture ever. Lighting and angle are horrid, but I wanted to show the full monty.

This is my favorite view. Draped over my kitchen chair. (Please ignore my dirty grout. It needs to be cleaned again.)

See that plate? My sweet mother-in-law gave me a set of those snowflake plates. So perfect for the winter season!

Friday, July 30, 2010

Table Runner - French General in Red

I saw this fabric and had to buy yards and yards of it. OK, maybe not that much, but I bought enough of it to do a table runner for my sweet mother-in-law (to match her new awesome red wall in her kitchen) and one to sell in our shop. Here are the pictures for you all to drool over. I know, right? Who knew I could actually do this? I used Quiltsmart interfacing to do the pumpkin seeds, and appliquéd circles on to make it look like centers to flowers. I added a sashing/border, and folded the back up over the front to finish it. I even did my own machine quilting. Hooray! I love projects that end up so beautifully.

 I'm also going to be in Bountiful, Utah tomorrow (Saturday, July 31) at an  Artisan Fair trying to sell things from our shop, so if you're in the Bountiful area, come see me (and all of our cool stuff) in person.


Sunday, June 6, 2010

Place Mats - Take One

My kids bug me. Really, they do. Okay, so maybe "bugs me" isn't the right term to use here, but allow me to explain. Our pre-dinnertime routine consists of the kids biting at my ankles, total chaos, prayers said in the middle of my dinnertime preparations, and then pulling chairs up to the counter and letting the kids eat at the counter. S-T-R-E-S-S. Big time. I hate it.

Well, we finally bought a table last week that actually fits our family. One that I'd like to use as a segue into a more calm and respectable dinnertime routine. One where the kids help set and clean up the table. One where we pray as a family sitting around the table, not standing in the living room amidst the chaos we call our life. One where Ed ( at 21 months) can help with something. Anything. And then it hit me. Place mats. He can put place mats on the table!

Here's what I did (in a nutshell):

* Starting with a yard each of two coordinating fabrics, cut into tops and bottoms of place mats, each measuring 18" x 13."
* Cut batting the same measurements, and place in between the top and bottom pieces of fabric.
* Pin to hold together, then sew vertical stripes 1.5" apart all the way across the place mat.

* Follow this tutorial on how to do a binding, and struggle until the last place mat to actually get it right (all except taking the time to do a blind stitch. Nah. No time for me for that one. I'm using my machine).

* Look at the finished product and smile. Big.


Now comes the hard part - teaching Ed to help when he's hungry and all he wants to do is scream at me and have me hold him. Nice. 

Thursday, April 8, 2010

Photography for Sneak A' Roos

I did some trade work with a lady who lives here in Lehi. She owns Sneak A' Roos, a darling kids' boutique, mostly featuring shoes. I took new stock photos of her shoes and some creative shots for her to use on her web site and to print banners for her boutiques and shows she goes to. I thought they turned out pretty darn good for someone who barely knows how to use a camera, no? I will have more photos of fun shots coming, so stay tuned!

The above photo is her current stock photo from her web site. 
The one below is what I did with the same pair of shoes. (I know, right?)

Another stock photo of some of her soft-sole shoes.

And now presenting, my delicious children in the darling shoes she has for sale.
 I did my best to not show their faces, because, really, nobody cares how cute the kids are. It's the shoes she's selling, not my children.


This last one is  by far my favorite shot of the day. SO precious! I hope she uses this one.